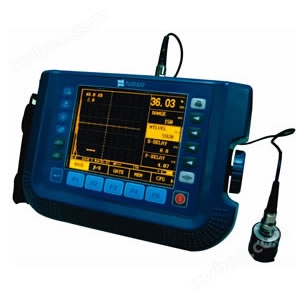
ultrasonic flaw detector(Number)TUD360It is used in boiler, pressure vessel, aerospace, aviation, power, petroleum, chemical industry, offshore oil, pipeline, military industry, shipbuilding, automobile, machinery manufacturing, metallurgy, metal processing industry, steel structure, railway transportation, nuclear power, universities and other industries.
ultrasonic flaw detector(Number)TUD360It is a portable industrial non-destructive testing instrument that can quickly, conveniently, without damage, and accurately detect various internal defects of workpieces(Cracks, looseness, pores, inclusions, etc)Detection, localization, evaluation, and diagnosis. It can be used in both laboratories and engineering sites.
1ultrasonic flaw detector(Number)TUD360Characteristics:
1High sampling rate, full display of RF waveform details, minimum display range2.5mm.
2Simultaneously possessingUSBandRS232Serial communication port.
3All software of the whole machine can be upgraded online through the communication port.
4Having an electronic clock calendar.
5Large capacity storage can store up to400width of clothAScan graphics and parameters40000A thickness value.
6Using high-capacity lithium-ion batteries, with no memory and a continuous working time of about6Hour.
7Has three adjustable biasesDACCurves can adapt to different industriesDACThe standard for drawing curves.
8、ELHigh brightness graphic dot matrix display screen, with no viewing angle restrictions, unaffected by temperature and sunlight.
9It has dual gate setting and alarm function, and can set the position and width of the gate arbitrarily on the screen. There are three alarm modes: incoming wave, lost wave, and automatic.
10It can switch between single probe and dual probe inspection modes at will.
11Waveform display: positive half wave, negative half wave, full wave, and radio frequency.
12Probe damping can be selected through the menu50、150、400Switch between them.
13Can be automatically generated using standard test blocksDACCurve.
14Has linear suppression function and high screen height0~80%Step distance:1%.
15It has printing function and can print thickness reports and wave amplitude curves through a serial printer.
16Screen hard copy can be performed to copy and print the graphics and menus on the current screen.
17Being able to followPCMachine communication, with powerful functionswindowsData processing software.
IIultrasonic flaw detector(Number)TUD360Technical parameters:
1Scanning range(mm):2.5~5000(Steel longitudinal wave)
2Pulse shift(ms):-20~+3400 us
3Probe zero point:0us~99.99us, Resolution0.01
4Material speed of sound(m/s):1000m/s~9999m/s
5Output damping(W):50,150,400
6Frequency range(MHz):0.2~10
7Gain adjustment(dB):0~110dB
8Vertical linear error: ≤3%
9Horizontal linear error: ≤0.2%
10Sensitivity margin for flaw detection: ≥50dB
11Dynamic range: ≥32dB
12External dimensions(mm):230×184×53
13Weight(kg):1.2Kg
IIIultrasonic flaw detector(Number)TUD360Basic configuration:
1Host
2、3A/9VThe power adapter
3Probe connection cable
4Straight probe2.5MHz20
5Angle probe5MHz8×9K2
6Coupling agent
7Strap straps
8battery
4ultrasonic flaw detector(Number)TUD360Selected attachments:
1Serial communication cable(9needle)
2、PCEnd communication software
3Serial printerTPUP-NH
4Probe, test block

